How to make a paper plate craft icosahedron?
An Icosahedron is a 3D shape that has 20 faces. The name comes from the Greek word eikosi, meaning ‘twenty’, and hedra, meaning ‘seat’. Depending on whether the icosahedron is regular or irregular, it can be symmetric with each of the 20 sides being the same shape and size, or asymmetric with each side being a different shape. This makes icosahedrons really quite fun to play with! If you use paper plates to craft the icosahedron you can aim for a symmetric one to not over complicate things.
The most traditional form of an icosahedron is with each face being an equilateral triangle. And that’s where we’ll start our icosahedron experiment. Once you and the kiddies have mastered the art of building an icosahedron with equilateral triangles (try saying that three times after a glass of apple juice), you can begin to experiment with other shapes. They might not all be successful, but that’s part of the fun.
Making an icosahedron out of paper plates is a fantastic activity for children to develop their understanding of the differences between 2D and 3D shapes, and releases their creativity when it comes to decorating the paper plates. Creating patterns, making hand prints (check out our animal hand prints page and create a very special safari icosahedron!) or simply drawing beautiful things on the paper plates is a lot of fun. Folding the plates, or even helping to fold, a good hand-eye coordination exercise. And talking about shapes in everyday life is a great introduction to geometry.
Oh, and putting 20 paper plates together to make a 3D shape makes for a BIG sculpture!
What do I need to make a paper plate icosahedron?
We’ll start with a simple icosahedron, and then if you’re feeling brave you can tackle a more challenging one! For the simpler icosahedron you will need:
- 20 paper plates: Either plain for you to decorate or, if you don’t have time, you can use decorated plates Quick Tip: This is a great way of getting rid of left-over paper plates that are no longer needed Stapler
- Paint: Poster paint works a treat. Grab at least two colours, and a thick brush to make painting the plates easier
For the more advanced Icosahedron you’ll also need:
- Set square (or something that has a 90 degree angle)
- Pair of compasses
- Double sided tape
How long will it take to build the Icosahedron?
This is basically your decision. If you want to keep this activity a bit shorter to maybe just fill half an hour or fun and some quick teaching about 2D and 3D shapes, use decorated plates to skip the painting phase.
The simple icosahedron (less precise and less mathematical, with some creative license!) doesn’t take too long as you’ll use visual judgement for folding the plates and stapling.
If you want to create a “perfect”, more advanced icosahedron where you fold the plates exactly, aiming for an even, perfectly symmetrical shape, you’ll have to make sure the triangles are all equal-sided, which requires a bit more time and precision. If you have older children, this is a perfect chance for them to show you what they’ve learned in maths (honestly, by the end of it they were teaching me!).
What do I need to do with the paper plates?
Okay, let’s get making.
If you’re using just two colours, paint the front of ten paper plates the same colour, then paint the remaining ten plates in a different colour. If you have more colours, paint away. Leave them to dry.
Take one plate and place it on the table, with the decorated side facing you. Make three folds, lifting the sides of the plates up so the circular plate turns into a triangle. Try to make every side equal on every plate. Do this for all 20 plates.
Take two different coloured plates. Place them next to each other so the one of the folded sides on each plate is touching. Line them up carefully and staple them together to secure. Pick up another plate (try to make sure two of the same colour are not next to each other) and line up the folded side with one of the stapled plates. Secure that with staples. Add one more to create a full loop of triangles.
Add a fifth plate to create a complete dome of five folded paper plates. It should look like a pentagon (a five-sided shape). You’ll notice as you do so the icosahedron beginning to take shape. Pun intended.
Create another pentagon dome, using five more plates.
With the remaining ten plates, create a long chain of triangles. Turn one of the triangles upside down, and place it next to a triangle that is the right way up. Push the edges of the plate together and staple them. Then add another upside down triangle. Then one that is the right way up. If you look at it, the triangles should create a zig-zag pattern. Keep doing this until you have used all ten plates.
Now you should have two pentagonal shapes and a chain of plates. Take the chain and bend it around so the ends meet. Staple them together to form a ring.
The pentagons will be the top and bottom of the icosahedron. Place one pentagon on the top of the ring and staple it down. Then turn the shape upside down and staple the other pentagon to the bottom.
Well done, you’ve made an icosahedron! Can you count how many corners it has?
How do I make an icosahedron with older children?
If you want to challenge your older children with building an Icosahedron you can go for the more advanced way of folding the paper plates (inside) so that you don’t see any plate sides standing, leaving just the triangles exposed for an impressive looking model!
For the best result you need each of the triangles to be folded so they are identical to each other. To avoid gaps between the triangles they all need to be folded precisely. That’s where the more mathematical tools will come in handy.
Firstly you will need to find out where the exact centre of the paper plate is. Sounds easy, right? It turns out there’s a bit of a challenge to it. You can use a pair of compasses, but a set square makes things a little easier.
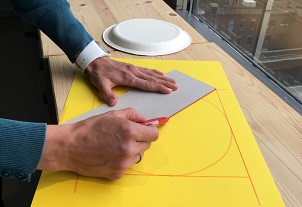
Use a piece of paper - bigger than the plate - and stick the plate on it with a strip of double sided sticky tape. Draw a line alongside one of the plates sides long enough to go over the bottom and top of the plate. Use the set square to create a square around the plate, touching the plate at four points.
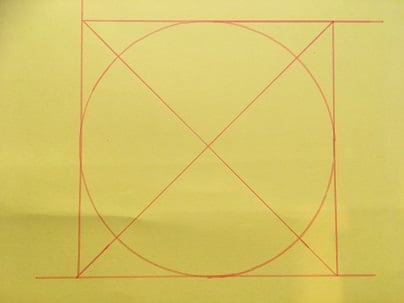
Draw two lines from the opposite angles over the plate. Where the two lines cross each other is the middle of the plate.
Create an equal-sided triangle within the circle
Now use the pair of compasses to draw the triangle. Set the compasses on the middle point and adjust the length to match the radius of the plate (If you can’t press down the paper plate flat, you will have to take away about 2 mm of the radius). Mark one indication on the plate’s edge and set the pair of compasses on this mark. Use the same length from the mark to create the next mark on the plate’s edge. If you continue you should have 6 edges.
Once you have 6 marks that you are happy with, take the ruler and combine every second mark with each other to get an equal-sided triangle. The easiest thing would be to cut this plate out and use it as a template to draw triangles onto the remaining plates, so they’re all the same!
What's the next step of the paper plate craft?
Once you’ve got triangles drawn on each plate, carefully start folding along the lines. But this time fold them inside. The folded pieces of the plates will be inside the icosahedron and therefore invisible from the outside.
Create one dome first, using 5 plates pointing their edges to the same point. Leave the fifth plate of the second dome open and only staple it on one of the dome plates. Don’t close the full dome as you will need this little door to assemble the whole icosahedron later.
Create a line of 10 triangles alternating upside and upside down triangles and staple the plates on their round pieces together. Make a full circle out of it by stapling the first and last paper plate of the chain together.
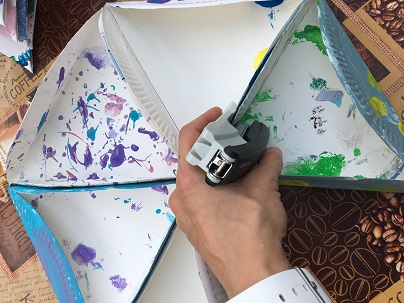
Then assemble the icosahedron! Start with one dome, put it on top of the triangle-chain-circle and staple the edges from the inner
of the icosahedron.
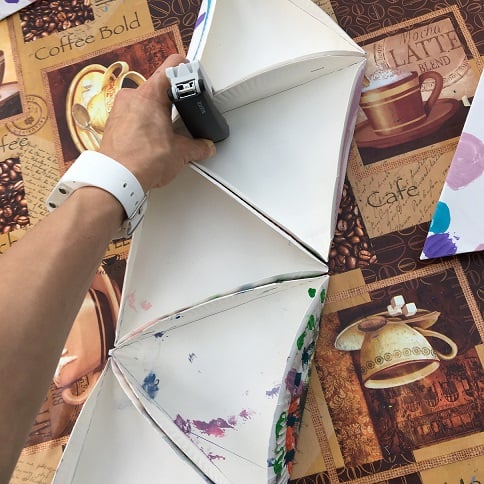
Do the same with the second dome by reaching your hand and stapler into the icosahedron through the “door” that you left open. Only the very last triangle can not be stapled and you will need a bit of sticky tape to hold it in place.
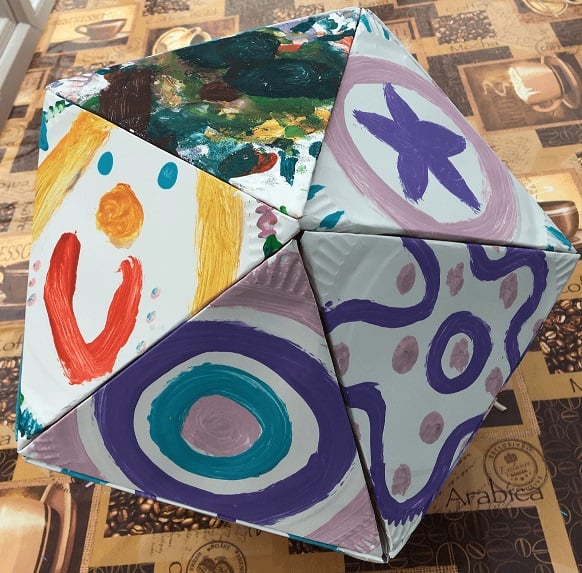
Et voilá - you have just created a beautiful icosahedron out of paper plates!
What can we do with the finished icosahedron?
There are lots of brilliant things you can do with your icosahedron. You could hang it from the ceiling with a piece of wool, or even draw numbers on each face to create a huge *twenty-sided die!
You can also create a lantern by cutting shapes out of the plates and using colourful, cellophane or tissue paper, adding an electric candle in the middle.
A disco ball would also be a perfect use for your icosahedron. Simply glue kitchen foil on the triangles and add a line to it before you close the last triangle.
SHARE YOUR CREATIONS WITH US
We’d love to see your creations, so why not share them on Facebook, Instagram or Twitter with #toucanBox. Our favourite snaps could feature in the next issue of toucanBox Magazine!

Not tried toucanBox yet?
Want craft projects, with all the materials you'll need, delivered straight to your door? Sign up today and save 50% on your first box!
Not ready to commit? Subscribe to our fun-filled weekly newsletter, jam packed with craft ideas, recipes, fun activities and more!
